I am so glad to finally be back to creating! I finally made it downstairs to create something. These are two cards created for the Double Dare Challenge group.. check em out. The Frankenstein card is my favorite!

I just love this image. My good friend Tabby sent it to me a while back, and I have been just about to have a fit to use it on a card. I made this for the DDC... Charlene challenged us to make a card with color blocking. I have never done this type of card before, but after checking out the others, I think this is sorta what it is supposed to look like. I wasn't sure if I was to use a solid or a pattern, and since I love these patterned papers and bought them a YEAR ago for scrapbooking (yeah.. I'm waaaaay behind)... I decided to cut it up and use it on a card. I think it turned out well.
Additional Info
Stamps: Best Fiends
Paper: basic black, white, various dp
Ink: stazon, kiwi kiss, basic black
Accessories: aqua painter, SU! markers, silver bling for Franks bolts, black sharpie pen (my new fave pen)

I finally made some time to stamp..and I am so glad! I was afraid I had forgotten how to complete a challenge, I've been away soooo long - LOL! Anyway.. this card is for the Dare Challenge Group. Michelle challenged us to use a stamp or really anything that we had not used in a long time. I decided to mount this one. I've had it for while now and have never used it because 1. the stamp is larger that a regular card size (see it sticking up over the top) and 2. I never took the time to mount it to the wood block (lazy). So.. I really like this stamp.. just had to figure out exactly how to make it into a pretty card.This is also for the Color Challenge from last week or some time.. can't remember. I've been jotting them down on my "to do" list. Thank for looking! ... and cyber hugs to all my stamping buddies, I've been missing hanging out with you guys!
Additional Info
Stamps: from the garden
Paper: gp white, basic gray
Ink: craft black, ridinghood red
Accessories: clear ep, SU! markers, aqua painter, white signo pen


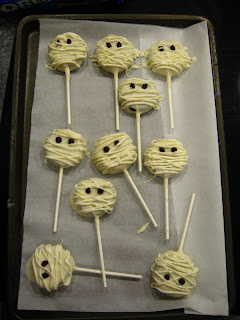
 Aren't these little mummies just the cutest. A parent made them for us last year and I just loved them so I had to try them for myself (thanks Kelly!!). I am making about 4.3 million of them for Halloween. They will go to my students as well as the teachers at my kid's elementary school. They are super easy to make. Here is how I made them...

 Step 3: Dip cookie into chocolate. Then place on parchment.
 Step 5: Put remaining white chocolate from mug into a zippy bag. Reheat if necessary. Snip corner. Zig-zag across oreo to make the mummy wrap.