Wednesday, November 24, 2010

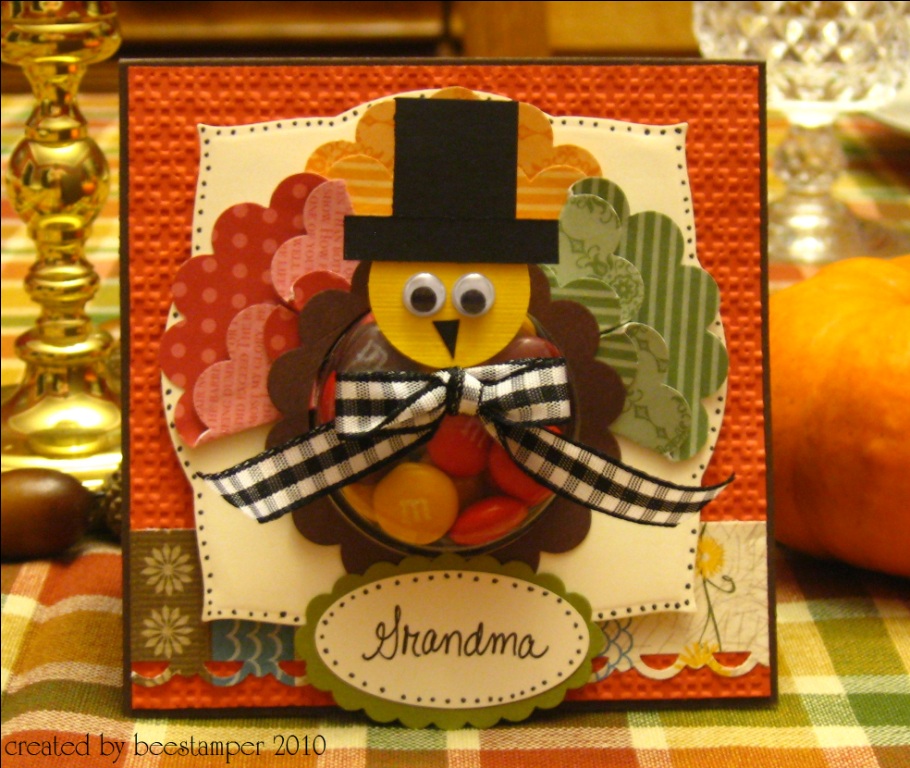
Turkey Treat Cup Place Card


I have been so busy in the kitchen today with my Mom. As we were working, this idea came to my mind. I knew I wanted to make place cards for the table, but I wasn't sure what I would make. A few things were swirling around in my mind... a turkey I made a couple of years ago for a Thanksgiving card, the millions of treat cups I bought and never used, a bag of Autumn colored m&m's I had - thank goodness the kids or hubby didn't find them... so, after we finished in the kitchen, I ran downstairs and this is what I came up with.
Happy Thanksgiving 2010 everyone!


Additional Info
Keywords: Thanksgiving place card turkey sweet treat cups punch art
Stamps: none
Paper: early espresso, cajun craze, very vanilla, dsp
Ink: none
Accessories: Punches: circle, scallop circle, oval, scallop oval, nestability, ribbon, googlie eyes, sweet treat cup, scallop edge punch


Saturday, November 6, 2010

SR CHRISTMAS CARD SWAP


These are cards that I recently made for a Christmas card swap. The rules were there were no rules, with the exception of one rule. haha.. no red and green combos. So, this is what I came up with. I love the little elves in the Merry Pursuits set by CTMH.
I used some old MOJO sketches.
Thanks for looking.

Card 1 Additional Info
Stamps: Merry Pursuits by CTMH
Paper: very vanilla, bazzil brown and tan, dp by CTMH
Ink: stazon
Accessories: SU! markers, ribbon, nestabilities, top note die, button, hemp, swirls embossing folder


Card 2 Additional Info
Keywords: SR CTMH christmas merry pursuits
Stamps: Merry Pursuits by CTMH
Paper: whisper white, rich razzleberry, dsp
Ink: stazon, kiwi kiss, rich razzleberry
Accessories: punch, nestability, bling, ribbon, embossing folder, sponging
Sunday, October 31, 2010

SEPTEMBER/OCTOBER SAP ART & ACTIVITES...

Here is a peek at some of the fun we had in the months of September and October.
Dinosaurs make really cool tracks in the playdoh. They are also fun to hide in the playdoh.


All aboard the shape train. This activity helped to intoduce for some and reinforce for others the basic shapes.


In September we spent some time on Nursery Rhymes. We used egg shells to create our Humpty Dumpty, and then fixed his boo-boo with a band-aide.

More fun with dinosaurs. This time with finger paint and triangles.


Black sponge painted bats with orange beads. (colors of the month).


Itsy Bitsy spider(s) in the spider web. More color reinforcement here.

We read one of our favorite Halloween stories, 'Woo! The Not-So-Scary Ghost,' then created our own ghost handprints with a mixture of half glue, half shaving cream. Makes a nice puffy ghost and is great for sensory integration.

5 Little Pumpkins Sitting on a Gate. This is a great fine motor activity. Believe or not, tearing paper is not so easy for two year olds. They tend to want to pull it apart.


Thanks for looking!

Tuesday, October 26, 2010

OREO MUMMY POPS...

Aren't these little mummies just the cutest. A parent made them for us last year and I just loved them so I had to try them for myself (thanks Kelly!!). I am making about 4.3 million of them for Halloween. They will go to my students as well as the teachers at my kid's elementary school. They are super easy to make. Here is how I made them...

Supplies: oreos, candy wafers (white & brown), sticks, bags, ribbon, parchment paper, tray
Step 1: Insert stick into center of oreo cookie. Don't use cookies that are cracked, they will break which may result in foul language.
Step 2: Melt wafers. I used a microwave/oven-safe mug. Will hold 1 bag of wafers. From my experience, it takes about 2 bags of wafers per oreo pack, resulting in approximately 25 mummies. Follow directions for melting on bag. 30 second intervals at 50% power.

Step 3: Dip cookie into chocolate. Then place on parchment.

Step 4: Melt brown chocolate in zippy bag. 15 second intervals at 50% power. Snip corner. The squeeze out to make eyes.
Step 5: Put remaining white chocolate from mug into a zippy bag. Reheat if necessary. Snip corner. Zig-zag across oreo to make the mummy wrap.
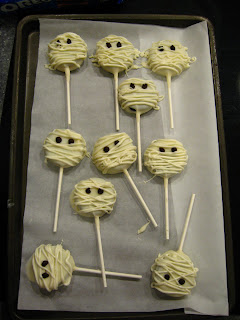
Step 6: Place tray in freezer for ~15 minutes.

Step 7: Remove from freezer and place in food-safe bags, secure with decorative ribbon. Add a Halloween tag if you like. I may add tags later if I have time.

Thanks for looking!!

JF BOX...


I made several of these for a lady who saw me working on the beehive boxes. I worked on them while two of my kiddos were at their gymnastics class. I think they turned out fantastic! I just love the fuzzy zebra paper (great texture) and the pink glitter paper (more like chipboard). I bought them off the rack from Michael's. The ribbon adds just the right touch. I'm sure she will have fun filling these.
Thanks for looking!

Additional Info
Stamps: serif alphabet
Paper: basic black, zebra print dp, pink glitter by Reflections
Ink: stazon
Accessories: nestabilities, ribbon

Sunday, October 24, 2010

WITCHY HALLOWEEN TREAT BAGS...

A friend of mine ordered these from me. I made 6 of each color. I just love how they turned out. The witch is a digital image by Tiddly Inks. I used my aquapainter to watercolor them, then added some ribbon. The mouse on the bag is from the Changito Halloween set.
Thanks for looking!

Additional Info
Stamps: Tiddly Inks
Paper: basic black, whisper white
Ink: SU!
Accessories: aquapainter, ribbon, nestabilities, paper lunch bag"

BIRTHDAY CUPCAKE...


I made this for a swap... masculine boy.
Love the cute images from Bugaboo Stamps.

Additional Info
Stamps: buguaboo
Paper: whisper white, ctmh
Ink: SU! markers
Accessories: nestabilities, bling, liquid applique

Saturday, October 23, 2010

MASCULINE BIRTHDAY CARD


I made this for a swap.. Just love this image.
Thanks for looking!

Additional Info
Stamps: Inkadinkado, SU!
Paper: chocolate chip, baja breeze, non-SU! dp, white
Ink: Image: stazon; Sponging: baja breeze, not quite navy, black, kiwi kiss
Accessories: punch, ribbon, twine, square brads, oval punches"

Friday, October 22, 2010

GO BEES!!


I made these for the teachers at school at the beginning of the school year.... and didn't take a photo.... after 77 of them, I just wanted them out of my house. And quite frankly, I didn't care if I ever made another one of them. I'm just that way. I'll make a couple of the same thing, but then want to do something new. Well, a teacher requested I make some for the Varsity cheerleaders... so, of course I did.. after all, I am the beestamper!!! haha!
Our mascot is the bee. The hive is from a Hambo stamp. I stamped it, whited out the tree, then enlarged it on my printer. I adjusted the size of the box, so that I could get 2 out of an 8.5 x 11 sheet.

I was working on these the other night at the gym where my youngest daughter and son take gymnastics. One of the moms came up to me and asked if I sold them.. long story longer... I will be making some for some cheerleaders of another school.. eek.. rivals even!! shhh.. don't tell my bee friends!! HA!
Thanks for looking!

Additional Info
Keywords: box bees beehive
Stamps: Hambo for the hive, Inkadinkado for the bee
Paper: SU!
Ink: stazon

Saturday, October 16, 2010

HAPPY BIRTHDAY DAD!


I made this card for my Dad's birthday. I used a MOJO Sketch and the Birthday Bakery hostess Level 1 Set.

Thanks for looking!

Stamps: Birthday Bakery
Paper: whisper white
Ink: stazon
Accessories: chocolate chip, dp, SU! markers, ribbon, brads

LinkWithin

Blog Widget by LinkWithin