Friday, June 27, 2008

WONDERFUL FRIEND


This is just a quick entry as I am off to get ready for a weekend away with my girlfriends!!! We will be scrapping all day tomorrow. I haven't touched my scrapbook in sooo long, I don't even know where I left off. So, have to get that orgnanized, finish the laundry and take the kids to the pool at some point. Have a great weekend and thanks for looking!
For today's challenge.

Additional Info
Stamps: boho backgrounds
Paper: very vanilla, close to cocoa, chocolate chip, regal rose, pretty in pink
Ink: SU! markers
Accessories: scallop punch, brad


Thursday, June 26, 2008

CATBIRD


This is for today's Ways to Use It Challenge - to use a bird on a card. It is one that I haven't used in a super loooooooooooong time. I just love this little image. The bird is stamped twice and popped up.Thanks for looking!

Additional Info
Stamps: little hellos
Paper: whisper white, basic black, old olive, summer picnic dp
Ink: stazon
Accessories: SU! markers, brad, tag punch


Wednesday, June 25, 2008

BEE SQUARED


This is a quickie I made for the this weeks color chalenge (wild wasabi, tempting turquoise, and white) and sketch challenge. I didn't have any wild wasabi, so I substituted some waaay old mulberry paper (green galore, I think). I popped the bee body and head up and added some ce to the wings so they would beeee shiny..Thanks for buzzing by!

Additional Info
Stamps: stampendous bee
Paper: whisper white, basic black, tempting turquoise, mulberry green
Ink: stazon
Accessories: SU! markers, CE, ribbon
Techniques: paper tole


Tuesday, June 24, 2008

CELEBRATE USA


I made this card for a fun challenge group that I am a part of - the DDC (Double Dare Challenge). This week it was Joanne's (aka sleepyinseattle) turn to issue the challenge. Her challenge was to make a patriotic card with either stars or stripes or both. Well, here it mine. I had such fun creating this and love the way that it turned out. I stamped the star from fun and fast notes, then colored it with real red and brillliant blue. I added brads in the center of the stars and then doodled some swirlies around to give the impression of fireworks and to fill in some of that white space. I also used my sakura glitter pen on parts of the stars for some sparkle. I folded the card so that part of the inside show and this is where I stamped "celebrate" from the wonderful words set in real red, then jazzed it up with some blue dots. Thanks for looking!


Additional Info
Stamps: fun & fast notes, wonderful words
Paper: whisper white, not quite navy, dp unknown
Ink: stazon
Accessories: SU! markers, ribbon, brads


Monday, June 23, 2008

HAPPY MONDAY!


....after some mean and nasty thunderstorms last night (you know... the kind that scare the children and make them want to sleep with you), we woke to a beautiful Monday morning here in the foothills of the Blue Ridge Mtns in Virginia. Lovely day and off to a fast and fun stamping morning... here is what I made for the Technique Lovers Challenge..

The challenge was issued by Sherry aka badsherry to use watercolors in the way of reinkers and a brush. I don't have reinkers *gasp*, so I just squished the lids down on the ink pads and used an aquapainter. I love how this turned out. It is also for the Gina K June Release Challenge #2. A sketch issued by Julie aka outtoimpress.Thanks for looking and have a fabulous Monday...


Additional Info
Stamps: merci
Paper: white confetti, old olive, ruby red
Ink: craft black, ruby red, old olive, summer sun, elegant eggplant
Accessories: aqua painter, ribbon, ticket corner punch, brads


Sunday, June 22, 2008

SUNDAY'S FEATURED STAMPER...


I made this for today's Featured Stamper - Diane aka Lost in the 60s... she has a super gallery. I decided to CASE this card.

What I changed:


  • 1. stamp set

  • 2. colors

  • 3. uses ribbon and HPH, plus sentiment in place of brads on lower right hand corner.

Thanks for looking!

Additional Info

Stamps: time for you
Paper: whisper white, dp, elegant eggplant
Ink: stazon
Accessories: SU! markers, HPG, ribbon, spiral punch


Saturday, June 21, 2008

IT'S A 'RUFF' LIFE...


I made this for June Release Challenge #1 from the Gina K. release party. What a fun sketch given by Erika aka SunshineMama! Since I just placed my order last night for my first ever Gina K. stamps and they weren't delivered today... I will have to settle for using my Studio G $1 stamp set. Going with the animal theme Gina has.. I decided on this little dog.... poor little thing has a "ruff" life... Why? you wonder? Well just look at that grass!! His people never mow the lawn and his legs are soooo short, he has a hard time finding his way around the yard and locating his stash of bones! Yep, it's "RUFF"!

Thanks for looking...

Additional Info
Stamps: Studio G
Paper: whisper white, basic black, unknown dp, green is from DCWV textured stack, real red
Ink: stazon
Accessories: SU! markers, punches, eyelet, silver garland string


WHERE AM I PLANTED???


This is for today's Inspiration Challenge.. Stef shared some beautiful stained-glass art by Frank Lloyd Wright. It was hard for me to pick which glass I wanted as my inspiration.. I ended up going with this one.


I love the simple clean lines and the circles... I used a straight edge to draw the black lines, and my cm circle punch set. The Studio G stamps are just the right size.. and I like the sentiment... bloom where you are planted... Thanks for looking!

Additional Info
Stamps: Studio G
Paper: white, certainly celery, real red, night of navy, yoyo yellow, unknown dp
Ink: stazon
Accessories: SU! markers, circle punches


Friday, June 20, 2008

CELEBRATE FREEDOM

I made this for today's Limited Supply Challenge... The challenge was to make a card that is NOT in the shape of square, rectangle or circle. so... mine is an eagle. I recieved the template from my friend Linda... (I think it is originally for quilting).. I paper-pieced his body where fabric would normally go. This really was super-easy, but labor intensive! (which is why he only has one wing!) The stamps are $1 Studio G from ACMoore. The dp is waaaay old and I can't remember where I got it from.. Thanks Linda for the fantastic template...Thanks for looking!

Additional Info
Stamps: Studio G
Paper: whisper white, night of navy, dp unknown
Ink: real red, night of navy
Accessories: circle punches, decorative star garland, brad
Techniques: cutting, cutting, cutting and more cutting

eta... here is the template... just right click, copy, & paste or save pic as...


Thursday, June 19, 2008

WAYS TO USE RICK RACK...


...or is it ric rac???

Anyway, the challenge on SCS for today was to use rick-rack on a card.. Here is mine..


Additional Info
Stamps: boho backgrounds
Paper: chocolate chip, very vanilla, regal rose, pretty in pink
Ink: none
Accessories: SU! markers (regal rose, old olive), rick rack, scallop punch, circle punches, brad


Wednesday, June 18, 2008

COLOR CHALLENGE AND A SKETCH

This card is for Tuesday Color Challenge to use soft sky, basic black and craft. I love my Sidekick Sayings stamp set and forget to use it. I dusted it off and used it today. Well, I don't have any craft so I used some confetti cream. This is also for the DDC challenge. It was Joan's turn to issue the challenge this week and she wanted something summer with flowers and a bird. So, I used a butterfly.. guess I'm breaking all the rules today.. what's that?? Do I hear a siren from the challenge police - LOL! You can see all of the other cards made by my double dare friends HERE... they are truly an amazingly, creative bunch of women!

Additional Info
Stamps: sidekick sayings, kind thoughts
Paper: soft sky, basic black, confetti cream (didn't have kraft), sofy sky dp
Ink: craft black
Accessories: jumbo eyelet, circle punches, ribbon, jolee's by you flowers

I made this for today's sketch challenge and also for my DBIL who turned 57! I think this cake has that many candles on it - bwaahahahaha!

Additional Info
Stamps: rubbernecker
Paper: barely banana, whisper white, basic black, cutie pie dp
Ink: craft black
Accessories: clear ep, SU! markers, ribbon, brads
As always.. thanks for looking and coming by for a visit!


Monday, June 16, 2008

DIY GLIMMER MIST


I made this card for today's Technique Lover's Challenge. The challenge: add a hint of a glimmer or a shimmer to your art. There are a couple of ways to do this.. Here are some recipes as shared by Beth...

To make the spray, get a small spray bottle.

Add to it:

1/4 teaspoon Perfect Pearls

1 ounce water reinker - depends on how dark you want it. About 10 drops is a good place to start.

Shake well and spray on your project.

Of course, how close you are to the project when you spray will determine the amount of coverage and wetness. Experiment to get the idea and recognize that you will never get exactly the same effects twice. You do not have to measure the ingredients exactly. It is important to use Perfect Pearls and NOT Pearl-Ex. Perfect Pearls has a binding agent in it and it will “stick” to your project. Pearl-Ex will fall off your project after the water dries unless you use the alternate recipe…..

Alternate method:

Get a travel size bottle of Hair Spray
add Pearl-Ex and reinker to it
Shake well and you are good to go.

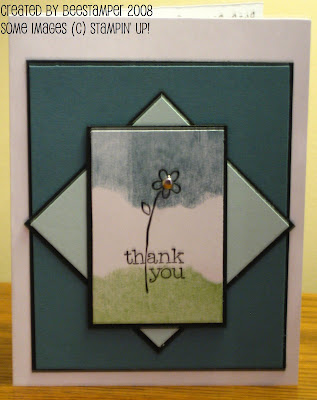
Well, I had a problem. I don't have pearl-ex or perfect pearls. I do however have lots of eyeshadow powder. So I used the alternate method. hairspray, shimmery eyeshadow powder and barely banana reinker.. viola! It is very difficult to get a picture of the shimmer.. but believe me it is there.

Additional Info
Stamps: bloomin beautiful
Paper: whisper white, certainly celery dp, blue bayou, soft sky
Ink: craft black, wild wasabi
Accessories: homemade glimmer mist, SU! markers, sticko epoxy circles, cb die cut blooms, white signo pen

Sunday, June 15, 2008

WHERE DO STAMPS GO WHEN THEY RETIRE?


The same places we do! After years of dedicated service, the following stamp sets from the Spring-Summer Collection 2008 are ready for a break! So join Stampin’ Up! in giving them a big sendoff and wishing them all the best as they begin a new chapter in their lives. But don’t wait too long—they’re only available through August 10, 2008, and then they’re headed to warmer climates! CLICK HERE TO SEE WHO IS RETIRING!!

Friday, June 13, 2008

TIE THE KNOT


I made this for a wedding that I am attending tomorrow. I just love how it turned out! I used the textile bc folder for the bg and the dress. I stamped the kind thought image onto the going gray cs then embossed with clear ep. I put dazzling diamonds on the raised parts of the dress, added some shimmery ribbon around the waist and adorned with some pink bling. You can find the template for the wedding couple on Valita's blog HERE. Thanks for looking!

Additional Info
Stamps: kind thoughts
Paper: whisper white, basic black, going gray
Ink: versamark
Accessories: ribbon, bling, clear ep, dazzling diamonds
Techniques: embossing


Thursday, June 12, 2008

TECHNIQUES CLASS

Thank you so much to the ladies who came out last night to my Techniques Class! We had such a great time stamping and talking. Here is a peek at some of the cool cards we made. I will be hosting another Techniques Class in July.. so be sure to check back and come if you can!

We made one of each of these cards as well as an example of the featured technique to put on a 6x6 page with printed directions to go into an album.


DOUBLE POCKET BAG TECHNIQUE


Photo Details
Made this by request for my Techniques Class. This bag features Summer Picnic DP and the So Many Scallops set. We used the scor-pal which made this project super-easy! You can find the tutorial for the Double Pocket Bag
HERE.

Additional Info
Stamps: so many scallops
Paper: Summer Picnic dp
Ink: purely pomegranate
Accessories: ribbon, jumbo eyelets, crop-a-dile, scor-pal
Techniques: double pocket bag


DAHLIA FOLD TECHNIQUE


Photo Details
I made a couple of buds with the Dahlia Fold technique featuring the cutie pie dp. My vine is made with the swirly stamp from the Baroque Motifs set. Bloom sentiment is from the Bloomin' Beautiful set. You can find the tutorial for the Dahlia Fold
HERE.

Additional Info
Stamps: baroque motifs, bloomin' beautiful
Paper: whisper white, so saffron, wild wasabi, cutie pie dp
Ink: wild wasabi
Accessories: circle punches, ribbon
Techniques: dahlia fold


SPOTLIGHT TECHNIQUE


Photo Details
Spotlight Technique using the Bloomin' Beautiful set.I CASEd this card from Debbie N. aka vafroggie44. You can find the tutorial for the Spotlight Technique
HERE.


Additional Info
Stamps: bloomin' beautiful
Paper: whisper white, purely pomegranate, basic black
Ink: jet black stazon, purely pomegranate
Accessories: circle punch, ribbon, blender pen, SU! marker
Techniques: spotlight


SCRATCH N' SNIFF TECHNIQUE

Photo Details
I made some scented embossing powder with some Wyler's orange drink mix (sugar-free). It is so fun.. and really works!

Here is how you do it:

Step-by-Step

Step 1 Create scented embossing powder by mixing 1 ½ parts clear embossing powder with 1 part of either sugar-free drink mix, sugar-free creamer or a spice such as cinnamon.

Step 2 Stamp your image using Versamark or Craft Ink (depends on color of EP mix).

Step 3 Apply EP mix and heat set...

I CASEd this layout from someone on SCS, and can't remember who to give the credit to.

Additional Info
Stamps: tart & tangy, wonderful words
Paper: whisper white, only orange, summer sun
Ink: only orange, versamark, black stazon
Accessories: scallop punch, circle punch, ribbon, scented ep
Techniques: scratch n' sniff


ZINDORF TECHNIQUE THANK YOU


Photo Details
Made this thank you for the ladies who came to my Techniques Class last night. We had so much fun. I saw this technique on a card by Julia aka Artystamper, you can see her card HERE. Instead of using sponges, I just used my brayer. This is also for the Sketch Challenge.Thanks for looking! You can find the tutorial for the Brayered Sky Technique HERE.

Additional Info
Stamps: for a friend
Paper: whisper white, soft sky, blue bayou, basic black
Ink: blue bayou, wild wasabi, black craft
Accessories: clear ep, brayer, brad
Techniques: zindorf (brayered sky)


Tuesday, June 10, 2008

WELCOME FRIENDS

This is for Sunday's Featured Stamper, Cindy! I loved browsing through her gallery. On my travels I came across this wonderful frame that she made call Fun with Tall Tales, you can see it here. I love the way she use her tags, ribbon, swirly clips, and buttons. I used these on mine as well.
What I changed:
  • 1. paper, ink color
  • 2. sentiment - I added "friends"
  • 3. frame size
Cindy you have an amazing gallery, and not only that, but you always leave such kind comments on everyone else's work. Thank you! I'm so glad you were the Featured Stamper!

Additional Info
Stamps: taffy alphabet
Paper: cutie pie dp, whisper white, basic black, wild wasabi
Ink: purely pomegranate
Accessories: tag punch, ribbon, jumbo eyelets, flower punch, brads, SU! markers


Saturday, June 7, 2008

TAG - I'M IT!

Julia tagged me to answer the following fun questions:

1. What were you doing 10 years ago? Well, I think 10 years ago, David and I were probably buying our 2nd house. I went back to school at age 28 to get my license in Education. At the time, I worked for a local RE/MAX office and went to school at night. It was very stressful and exciting. At that time, David and I had been married for 6 years and had not started a family.

2. Five things on today's "to do" list.

  • 1. Finish laundry (always on my "list")
  • 2. Make a wedding card and possibly a gift
  • 3. Take kids to the pool
  • 4. Chill Out - It's Saturday
  • 5. Clean my Stamp Room and start getting ready for my upcoming Techniques Class

3. Snacks I enjoy: I skip around, currently I love Kettlecorn - yum!

4. Things I would do if I was a millionaire:
  • pay off the mortgage
  • put away money for the kids
  • take entire family on a missions trip
  • finish the basement and have my very own dream craft room (right now I have squatter's rights in the dining room)
  • buy my DH a really nice camper (we just sold ours *pout*)
  • buy a farm and get Allison a horse
  • spend summers on the ocean in our very own beach house and have friends come to visit... (I just love having company!!)
  • and of course - go to Disney World!

    5. Places I have lived: All in Virginia... Newport News, Gloucester, Lynchburg, Fredericksburg

POPSICLE INVITE


I made this for invites to my DD's birthday. I cased the card from Barb Mullikin. I just love the use of the scallop punch on this one along with the popsicle stick. The lemon is embossed with homemade scratch n' sniff ep. To do this, take clear embossing powder and add sugar-free drink mix to it. Mix together and emboss as normal. It REALLY works!


FRIENDSHIP


This is for the DDC issued by Julia aka artystamper. She sent our little challenge group this adorable Magnolia Stamp image in the mail along with the designer paper. I just love this little girl! The only rules were to use the image and a piece of the dp (either side).. of course I chose the flower side!This also qualifies for Friday's LSC to pick a Silly Celebration and make a card for it.. I chose National Gardening Day. My little girl has been out in the garden picking flowers, made a daisy chain out of them and put them as a crown on her head.I used my SU! markers to ouline the image, then used my blender pen to pull the color into the image. This is also a buckle card, the "buckle" slides in under the popped up flower.I wanted some texture, so I ran the apricot appeal base through the cuttle bug and picked the template that best matched the little flowers on the dp. The sentiment is actually stamped on the inside of the card.Thanks for looking.. And thanks Julia for a fun challenge!


GRADUATION 2008!

This is for our nephew who graduated last night... I cased the layout from Anne H. aka Itsapassion.. just love her work.. check out her gallery here. I used Kyle's announcement.. cut out the school crest, layered with the scallop punch and popped it up. I really like how it turned out! The inside has a pocket at the bottom for holding cash - what every grad wants! Remember when $100 used to be a lot of money - now it is just a tank of gas *sigh*!!

Additional Info
Stamps: baroque motifs
Paper: whisper white, basic black
Ink: versamark
Accessories: gold ep, scallop punch, brads
Techniques: embossing


Thursday, June 5, 2008

ALTERED GIFT SET FOR MRS. BURNETT

I made this for my DD's Kindergarten teacher. I bought the cd box and clothespin from ACMoore. I gave the box a thin wash of white paint, then used decoupage to adhere the dp. I did the same for the clothespin. I used my taffy alphabet set to stamp out the teacher's name on one side and the school initials on the other side. Used the dp to make a coordinated double pocket bag and filled with a set of matching cards. The jar candle is baked apple - how perfect - and came from my friend Tabby.What do you think?
Below are close-ups of each item..


LinkWithin

Blog Widget by LinkWithin