Monday, March 31, 2008

PAPER TOLE

This is what I came up with for the TLC challenge today. Paper tole stamping with no flower images..I stamped my image 3 times.. one as a base, the second grass and lighthouse cut out and popped up and the third just the light cut out and popped for the third layer. What fun! This was my first time trying this technique, and since I like to cut and color, it may be something I will do again and again.I also wanted to use my hph! So how to get that big ole sentiment in that little square.. I thought maybe I will highlight just a few words... nope, couldn't get it to work today... So, I said to myself, "Self, what about all of that darkness, let's take a few minutes and look through the Good book and find something about that. I did stamp the sentiment randomly on the creamy caramel layer with river rock classic ink before I sent it through the cuttlebug.. just needed some texture. I found the verse and printed it out and taped it to the outside of the hph, and did a Faith has shared before and colored the silver with a black sharpie marker. Honestly, I didn't think that it would work, but after 3 layers it covered.. and of course in my impatience for it to work I thought "Hhhmm, maybe I should 'heat set' it with my trusty embossing gun...BAD idea... duh, it is metal and it gets REALLY HOT! Thanks for looking!

Additional Info
Stamps: a light unto my path
Paper: whisper white, basic black, creamy caramel
Ink: jet black stazon, blue bayou, river rock, old olive, ruby red
Accessories: blender pen, summer sun marker, ribbon, hph, cuttlebug
Techniques: paper tole stamping
Difficulty (1-Easy 5-Advanced): 2

Sunday, March 30, 2008

Sketch Challenge and Just Spray It

SKETCH CHALLENGE

So, I am a little late on uploading this challenge. I was at my parent's for the week and suffice it to say - her dino computer and my camera were not friends... you know, the gizmo wouldn't fit in the whozi-ma-whatzit! I loved the sketch Rox.. and am very pleased with how this card turned out! I used Boho Backgrounds (looove it) set with Friendship blooms. The "thank you" sentiment is computer generated as I couldn't take ALL of my stamps with me - lol! Thanks for looking!

Additional Info
Stamps: boho backgrounds, friendship blooms
Paper: whisper white, blue bayou, soft sky
Ink: blue bayou, purely pomegranate
Accessories: brads, label punch JUST SPRAY IT!
For this challenge it was to use some sort of spray. Here is what I did...
I was at my mother's (spring break and all, yada, yada, yada) - she is just nuts about birdhouses and everytime I go, she has another one for me to paint! (while I was there she bought about 5 more from the dollar tree... ) So, this time I suggested that I stamp on them - no problem. Did one, but with the wood grain I wasn't pleased with how it turned out. The lines are not sharp and I ended up going over most of them with paint. It is cute, my mom likes it, but the stamper in me was really disgusted with it.. So, onto birdhouse #2.. Here is how I used this challenge...I stamped the entire bloomin' beautiful set onto some whisper white cardstock. Then I colored everything with either SU! markers or with my blender pen and the blue bayou ink pad. I then sprayed it with a fixative so that I could cut it out and decoupage it onto a birdhouse.. It is the cutest thing! In order for this to work with the SU! markers, the ink must be set with a spray of some sort, otherwise when you wipe it with the decoupage it will smear into an inky mess and all of the hard work of coloring is destroyed!!!It is sooo cute. Birdhouse #1 is the green roof.. notice the not so sharp images - yuck! The decoupage is Birdhouse #2.

Saturday, March 29, 2008

SWAP BASKET & MINI-CARD


These are for a swap I am participating in today. The treat basket is very small, and so incredibly easy to make. Here is the link to the TUTORIAL by Leslie Miller...

I filled these little baskets with some crimped paper and some nuggets (3 fit perfect and help to weigh it down so it stand nicely on its own). I then bought some mini envies from Michael's and made some little matching cards to go with. This would make an excellent Thinking of You for someone!

Monday, March 24, 2008

HAPPY EASTER & Flap-Fold Technique


Happy Easter.. Hope you had a blessed Easter day. After an early church service and lunch, we went up to the Peaks of Otter Lodge and walked around. They had drained the lake to work on the dam, so the kids were intriged by the empty lake. It was cold and windy, but nice and sunny. Everyone had a turn sitting on a branch in this tree...


*************************************************************************************


Monday's Technique Challenge***

This is the card I made for the flap-fold technique for today's challenge. I really love this bloomin' beautiful stamp set! I used soft sky dp with blue bayou solid cardstock. To color the flower, I used my blender pen with my blue bayou ink pad and watercolored, then added white dots for the flower centers with my signo pen. Here if the LINK to the challenge where you can find the directions. What do you think?

Additional Info
Stamps: bloomin' beautiful
Paper: blue bayou, SU! dp, whisper white
Ink: jet black stazon
Accessories: ribbon, brads, hph (ribbon slider), white signo pen, friskars adjustable circle cutter
Techniques: fold flap card
Difficulty (1-Easy 5-Advanced): 2


AND THE WINNER IS..............

Julie A. said...
What great blog candy- Thanks for the opportunity to win! Celebrating Easter is a reminder that Jesus paid for our sins on the cross, was resurrected, and through Him we are forgiven.
March 21, 2008 10:17 PM

Ok.. I don't know how to use number generator..(whatever that is).... So, I just wrote everyone's name on pieces of paper and had my DD, Sarah, pick out a name. She picked Julie A.! Thank you to everyone who entered and shared what Easter means to you. I really enjoyed reading your entries. And Julie, e-mail me your address and I will get that candy in the mail to you!

Friday, March 21, 2008

TIME FOR SOME BLOOOOOGG CAAAANNNDDY!


Yup! That's right.. time for the blog candy, cause the easter candy is disappearing around here pretty fast and furious... I keep finding the little wrappers all over the place... like we have mice or something... we DON'T... it's just the kids - *giggle* I mean, gosh, we just got finished with the Valentine candy... now Easter candy... I think I may throw some of it away, and Easter isn't even here yet!

But I digress.. on to what you are really here for.... FREE BLOG CANDY!!!

All you have to do is leave me a comment.... and answer this question...What does Easter mean to you? Pretty simple... it might be chocolate bunnies, peeps, sunrise service at church, a life made new...

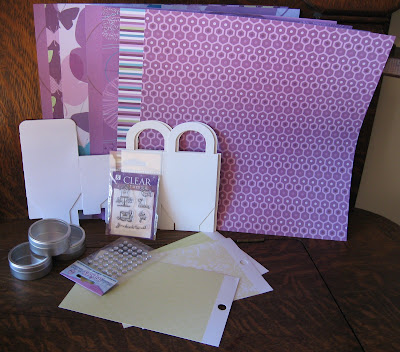
The DETS about the candy... I will be giving away some big bling!, a studio G clear stamp set, some DP and a some small tins and favor boxes for you to alter.. and a mystery prize - hhhmmm....

You have until Sunday midnight to leave a comment. Make sure you tell me who you are and check back on Monday... I can't give away the candy to anonymous!!ha!

I'VE BEEN TAGGED...

So yesterday I saw on Julia's blog - Create With Me - that she tagged me.
That means that I am now supposed to list 7 Random Things about myself.
So here are some things that make me who I am.

1. The beach is my favorite place. I love the ocean, the smell of saltwater in the air. I grew up on the coast and now live in the Blue Ridge Mtns of VA... and I miss the sand, the air, the ocean breeze, fresh seafood, blue crabs that pinch your toes, the Colonial Pkwy that runs through Yorktown, a seagull's cry, the way the air gets charged with electricity just before a summertime thunderstorm, the way a broken down boat stranded on land looks so lonesome and sad, the spray that covers your face when your riding on a boat as it bounces along the top of the water, the way certain folks from where I grew up say things like "high tide," and call everyone "dahlin,'" and the fields of daffodils that grace the land on those long, country roads that wind their way through Gloucester..... I could go on forever.

2. I am the first in my family to attend college. I have two degrees and am a stay-at-home mom. I wouldn't change it for the world!

3. I was held at the border of Romania in a train car with 60 other college students in my group. We were not allowed in - no explanation. They removed our car from the rest of the train, letting the train procede. We stayed. They went through all of our belongings, this was a very odd feeling. Two guards took up residence at each end of our train car with sub-machine guns. They kept us there for 24 hours before sending us back to Budapest, Hungary the next mornning. Yet, I was never even afraid. This was in November, that December, the Romainians killed their leader (1989).. do you remember that?!? I'm so glad they didn't let us in! I love the USA! We then flew on to Moscow where we were given pig tongue for our "in-flight" meal - Yuck! I'll stick to pretzels thank you!

4. I can't do anything without making a big mess! You should see my stamp table right now!!

5. I have trouble throwing things away. 'Cause you never know... I might need that tiny piece of crooked paper.. LOL

6. I used to think that teaching a classroom of 25 5th graders was hard work, now I'm a SAHM of 3... that classroom gig was a piece of cake!

7. I love anything crafty that I can do with my hands... notice, I didn't say I was good at everything, but I do like to try and learn. I fantasize about living in an artisan commune, where I can stamp, draw, paint, sew, whatever...whenever I want...and learn from others. I would also love to travel some more and see some of the awesome things God created before my time is up.....

FRAZZLED FRIDAY....

Gosh, where did this week go? I mean, wasn't just yesterday Monday! It has been a whirlwind of activity here at our home with Easter egg hunts, girl scout award ceremonies.... you name it. And of course there were 3 parties to attend.. all of separate days, as well as teacher appreciation week..

This week has also been a week of fun surprises... I won some blog candy, got a card in the mail from and SCSer that I just adore, and recieved my DSS (Divine Secret Sister) reveal package in the mail.. loaded with tons of goodies!! Also Julia (Create with Me) tagged me yesterday, which was also the Ways to Use it Challenge.. and guess what we had to use... tags!! LOL, what a coincidence! So, go get your self a cup of coffee and sit back.. this will be a rather lengthy entry as I have several things to post!

THURSDAY'S CHALLENGE - WAYS TO USE IT - TAGS!
This is for today's Ways to Use It Challenge. To the best of my ability, I tried to make a "Faith" card. I love her style and had fun trying to make a knock-off... I also love tags, and forget that I have this punch..

Additional Info
Stamps: fun & fast notes
Paper: whisper white, basic black, lovely lilac, dp by K&Company
Ink: jet black stazon
Accessories: SU! markers, ticket corner punch, brads, ribbon

FRIDAY'S CHALLENGE - LIMITED SUPPLY - SAG, YOU'RE IT!

This is for today's Limited Supply Challenge. The card on the left is a kickstand without sentiment.. the one on the right is a traditional with sentiment. I stuck to the rules:
Stamp: 1 stamp used (computer generated sentiment)
Cardstock: 1 piece of DP, 2 colors, 1 neutral
Tools: ticket corner punch.
My image is so big that I wanted that the be the main focal point. This can easily be switched up by running the dp through the cuttlebug for a different look... punching the sentiment out of the scallop punch -(which is on backorder *pout*).. you get the idea.Thanks for looking!

Additional Info
Stamps: gossip club by art impressions
Paper: whisper white, old olive, chocolate chip, dp by K&Company
Ink: jet black stazon
Accessories: SU! markers, ticket corner punch, brads, ribbon

MY DSS REVEAL PACKAGE...
This is the super, fantastic reveal package that I got in the mail today! WOW! THANK YOU TABITHA - YOU ARE THE BEST SISTER EVAH! I just can't believe all of the stuff.... I am sooo blessed!


EASTER EGG HUNTS, TEACHER APPRECIATION, GIRL SCOUTS.. ETC..
The many Easter festivites were so fun, and I am so glad that I could make it to most of them, with the exception of Andrew's (I had a meeting).. the weather was exceptional, just a cool, brisk wind which is traditional for this time of year for us.
This is for Sarah and Allison's
teachers.... we appreciate all of the time and effort she puts into teaching her class. I made a very small card to match the target $1 spot mailbox, and filled it with some goodies..

Additional Info
Stamps: teachabella
Paper: whisper white, taken with teal, dp by provocraft super slab rob&bob studio
Ink: jet black stazon
Accessories: SU! markers, friskars circle cutter, circle punch, ribbon, brad

...I'll be back later to post the blog candy....yummmmm..........................


Wednesday, March 19, 2008

I WON SOME BLOG CANDY & WEDNESDAY SKETCH!


That's right.. I won some blog candy!!! Hooray! I love it! My fellow SCSer Julia Aston has a fabulous blog called Create With Me... she creates some really fantastic stuff and is such an inspiration. Please check out her blog by either clicking on the link above or on the sidebar. As a way to celebrate having 2,000 hits on her blog, she gave away some MFT blog candy - lucky me, I WON! This is what I will be getting-->

I am sooo excited because this will be my first MFT set! ... and look at that yummy dp! So, thanks again Julia!!
So.. in the spirit of giving.. I will post my very own Blog Candy Giveaway on Friday.. so check back to see what it is and to enter to win!!


On to today sketch challenge... Here is the sketch by Roxie.. I really like this sketch, but had a super hard time with stamping the image.

My dp is Wedding Multi Mat Pad by K&Company.. so I went with the title and made a wedding card. I used he wedding cake stamp from Fun & Fast Notes. I stamped the image 5 times before I finally got it centered on that tiny piece of paper - whew! Now there are lots of wedding cake images for my DD Sarah to play with - at least she will be happy. I used some LA for the icing on the cake, and while it was still warm and smushy I went over it with my sakura glitter gellyroll pen, I also went over the entire image with it when I was finished coloring. I used some bling in the corners instead of brads to jazz it up a bit. I pulled out my swirl cb for the background piece, and added some irridescent ribbon that shines beautifully in the light. Thanks for looking!

Additional Info
Stamps: fun & fast notes
Paper: whisper white, bordering blue, dp by K&Company
Ink: jet black stazon
Accessories: SU! markers, liquid applique, ticket corner punch, bling, sakura gellyroll glitter pen, ribbon, cuttlebug, swirl embossing folder
Techniques: dry embossing
Difficulty (1-Easy 5-Advanced): 2


Monday, March 17, 2008

TECHNIQUE MONDAY


This is for today's technique challenge - a reverse embossing technique. This is really a nice look that is super easy. I made this one for my mother - she loves flowers and gardening. Thanks for looking!
Here are the direction on how to use this technique to make your own:

1. Take your CB folder and open it up so the negative side is facing down on your table. This is the side where the CB logo is.

2. Using whatever color ink, and whatever type of ink, ink up the negative side using either a sponge, brayer or the ink pad itself if you are using spots or the petal chalk inks.

3. Lay your cardstock over your inked side, close the folder and run it through your CB. Make sure to wash your folder ASAP, to avoid any staining from the ink. I have not had a problem with this, as long as I wash it right away!

4. Voila!! Now you have an inked and embossed image to add that extra touch to your card!! Remember, if you are using chalk or pigment inks, you will want to wait for them to dry before putting your panel on your card. You can also use your heat gun to help them dry, or even emboss them with embossing powder for even greater flair!!! The sky is the limit!!!
Thanks for Ann aka amf1060 on scs for these directions and for hostessing the challenge.

Additional Info
Stamps: Embrace Life
Paper: whisper white, basic black, cameo coral
Ink: jet black stazon, purely pomegranate, wild wasabi
Accessories: SU! markers, sakura jelly roll glitter pen, ribbon, blender pen, cuttlebug
Techniques: reverse embossing
Difficulty (1-Easy 5-Advanced): 2

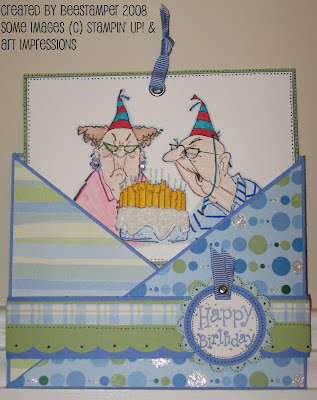
BIRTHDAY BASH! Pocket Card


I made this for John, my brother-in-law.. his birthday is tomorrow! I hope he gets a laugh out of this couple...

Friday, March 14, 2008

NO TOOL CHALLENGE - say WHAT?


I made this for today's Limited Supply Challenge.. The challenge was to make a card without using tools.. just the basics. I came across a card in the gallery earlier this week that had this cute little origami cup on it. I just love it and it is so simple to make - all folding - no tools. I thought it would make a clever basket and wanted to fill it with Easter eggs. I stamped my bg paper with a flower, eggs, and sentiment from a $1 Studio G set that I bought at ACMoore... I have a weakness for those little acrylic sets. I also wanted to do some layering and dots like Faith, cause I just love the look of her cards! I think this makes a cute little Easter card for a child.Here is the link for the origami cup directions: http://www.origami-instructions.com/origami-cup.html

Additional Info

Stamps: studio G
Paper: whisper white, basic black, pink passion, green galore, only orange
Ink: jet black stazon
Accessories: SU! markers, dazzlin' diamonds, ribbon
Up close of basket---->
I wanted to give you a close up of the origami cup.. you can make whatever size cup you want and you can actually fill it with stuff..hhmmm the possibilities are endless...

Thursday, March 13, 2008

POT O' GOLD - THURSDAY CHALLENGE


So.. this is my entry to days Ways to Use It Challenge.. only using dp or patterened paper. I bought this gold paper with gold foil dots off the rack at ACMoore. The gold coin ornament ribbon is by Wrights. Anne (itsapassion) dared me to make an all gold card with only circles.. I thought of many things before settling on this. After I saw a bunny basket, I knew I had to make her a pot o' gold, with a 3x3 circle card to go with it. I know the ribbon had black on it - I hope this does not disqualify me.This all started a couple of weeks ago when Anne was a little frustrated with a challenge card she made (you can see that card here http://splitcoaststampers.com/gallery/photo/832388?cat=500&ppuser=49512).. and in her description, said that she almost posted a white card. I then left her a comment and "Dared" her to post a all white card. Which she did.. you can see it here http://splitcoaststampers.com/gallery/photo/840589&cat=500&ppuser=49512.. she did a fabulous job.. So in the spirit of friendly competition, I would love for any of you SCSers to come up with a all gold, only circles card. pm me.. I'd love to see what you create... Now, to think of another double-dog dare for itsaPASSION! hhhmmmm!

Additional Info
Stamps: none
Paper: gold
Ink: none
Accessories: ornament ribbon by Wrights Close-Up of each...
Want to make your own basket.. check out Leslie Miller's easy tutorial here... you won't believe how easy these little baskets are to create!

Wednesday, March 12, 2008

ORIGAMI CUP CARD


I saw a card yesterday made by MakiJ... she had an origami paper cup on it. I just thought it was so pretty that I had to try my hand at it. Origami scares me, as folding paper and following detailed instructions make my eyes cross, but this was so easy and the directions that she sent me are very clear and easy to follow.


Things that I changed..


1. layout


2. colors


3. stamp set


I kept the bookmark the same as I thought that was a clever thing to put in the cup.Here is the link to her card And here is the link to the directions

Additional Info

Stamps: embrace life
Paper: whisper white, old olive, blu bayou, non-SU! dp
Ink: jet black stazon, blue bayou
Accessories: SU! markers, blender pen, brad, crop-a-dile, eyelet, ribbon, distressing tool
Difficulty (1-Easy 5-Advanced): 3

More Faux Cloisonne' & Using Up Scraps...


If you paper craft, you know about scraps... that one word conjurs up many pictures I am sure. How to organize, what to save, what to throw away?? I cannot bring myself to throw away good paper.. cause you never know.. one day, I might need that scrap! Today, I decided that I would use only scraps (with exception to card bases).. and put all of those Cloisonne' flowers that I went crazy stamping the other day, to good use. So.. I will not bore you with the details. If you want directions for making your own Cloisonne' card, you will find it in the previous post. I made a ton of cards with these things, as well as decorated some favor boxes.. yet, I still have 10 of them left. I guess they will adjorn to my scrap box with the rest of the red-headed step children - lol!


Monday, March 10, 2008

FAUX CLOISONNE' TECHNIQUE...


So... I loooove this technique! It is so easy and fun! I rescued my Vera Bradley catalog from the trash and have been stampin' it up... Thanks for looking!
Here are the directions as given by Betty aka gbedwright (SCS)..The technique I wanted to try is Faux Cloisonne'. There are not that many examples in the gallery using this faux technique. I have just finished my first ever Faux Cloisonne' card. The technique is very simple.....yet intricate.

You will need.....
  • Outline stamps
  • Magazine/calendar glossy pages
  • versamark or gold pigment ink
  • gold or silver embossing powder
  • Crystal Effects is optional

Find a magazine picture or calendar photo that has a pretty image. I used a floral background because my image is a flower..... It can be any image you like. Then, stamp directly onto the magazine/calendar page. Gold/Silver emboss the image and cut out. At this point, you can add Crystal Effects to the image. I added it to mine, but I cannot really tell that much of a difference with it. Plus, CE makes the thin magazine pages want to curl up around the edges....or stick to my grid paper. It is very delicate paper and tears easily. Arrange your image(s) however you want onto your cardstock, adhere, and finish the card.
Additional Info
Stamps: embrace life
Paper: whisper white, real red, gable green, basic black, pretty in pink, only orange
Ink: versamark
Accessories: sterling silver ep, ribbon, ticket corner punch, brads, various SU! markers
Techniques: faux cloisonne
Difficulty (1-Easy 5-Advanced): 2


CLOSE UP OF IMAGE----------------------->

Friday, March 7, 2008

FUN & FAST FAVOR BOXES


Aren't these gable boxes adorable!!! These will be a project for a workshop I am having this weekend! I found the favor boxes on clearance in the bridal section of Target.. they were marked wwaaaaayyy down! I just love a deal! Thanks for looking!

Additional Info

Stamps: fun & fast notes, sprinkles
Paper: whisper white, blue bayou, purely pomegranate
Ink: jet black stazon
Accessories: SU! markers, ribbon, brads, hole punch
Difficulty (1-Easy 5-Advanced): 1

OH BOY!


This boy card has a little more...


I made this for MFT Sketch Challenge 20.. Thanks for looking...

Additional Info

Stamps: framed greetings
Paper: whisper white, taken with teal, brilliant blue, sky blue, non-SU! dp
Ink: jet black stazon
Accessories: SU! markers, tag punch, circle punch, brad, safety pin, ribbon, dazzlin' diamonds, glue pen, glue dots, stampin' dimensionals

WELCOME BABY BOY!


I wanted to make a simple baby card today.. and use a safety pin.. this is what I came up with.. what do you think? I really like all of the white space.

Additional Info

Stamps: framed greetings, fun & fast notes (sentiment)
Paper: whisper white, cool carribean
Ink: jet black stazon
Accessories: SU! markers, tag punch, brad, ribbon, safety pin, glue dots

BASKET-case


Cased this basket.. I have been on a self-imposed Longaberger fast... and I figured since I can't buy them.. I can make them outta paper! lol! Here is a link to Laura Canale's tutorial... http://wishyouwerehere-laura.blogspot.com/2008/02/basket-tutorial.html

Additional Info

Stamps: none
Paper: single 12x12 sheet makes 1 basket
Ink: none
Accessories: brads, ribbon , hole punch, ticket corner punch
Difficulty (1-Easy 5-Advanced): 4

Thursday, March 6, 2008

CALL 555-RIDE


Well, this is a tcc or triple challenge card.. It didn't start off that way, but that is how it ended up. I thought it would be fun to participate in the MFT Guest Designer challenge... as I am a monochromatic girl.. I just love varying shades of the same color.. so fun! Plus I like todays Ways To Use It Challenge of using the computer in some way... so I printed out the Grandparent Wanted Ad to go with my bike... It is inspired by some stickers by sticko called Classifieds.. I tweaked one of theirs to meet my needs and go along with the main image. I love to ride bikes and spent countless hours as a kid riding my bike wherever it would take me... love those memories! And I came across an old sketch challenge, so there you have it! I think I'll be sending this card to my parents as an invite from my kids... we just love spending time with them!

Additional Info
Stamps: time for you
Paper: whisper white, handsome hunter, gable green, dp by me & my BIG ideas
Ink: jet black stazon
Accessories: SU! markers, ribbon, big & small brads, black ink pen for the 'faith dots'
Difficulty (1-Easy 5-Advanced): 2

Wednesday, March 5, 2008

SC166 - Baby Buggy


This is for today's sketch challenge.. I love this sketch as it works for many different stamps... I don't know why, but I just have trouble mixing dps... but, trying to stay true to Roxie's example I put this together... still not sure about the dp..it just seems a little "too busy" for me.. I think in the end it makes a nice card. I paper-pieced the baby buggy and added a heart brad and some eyelets to give it a little umph! Thanks for looking!

Additional Info
Stamps: fun & fast notes
Paper: whisper white, pretty in pink, purely pomegranate, non-SU! dp
Ink: jet black stazon
Accessories: SU! markers, ribbon, heart-shaped brad, eyelets, crop-a-dile, double circle punch

LATE NIGHT CARD FRENZY...

OK...So it is getting down to the wire for me on a 200 card order that I have to get finished up by the middle of next week.. Nothing like cutting it close and working under pressure, right? So... here is what I made last night... for each card I made several copies... Kind of like singing that song 99 bottles of coke on the wall..99 bottles of coke, take one down.... OK, you get the picture. I wanted to get these on for today's post.. then off to stamp some more! My Mother will be soooo proud - love you Mom! No one has any clean clothes to wear, but I sure do have a lot of pretty cards - lol! I've decided to start including the details for any of you who may want them... enjoy!


FAST HEDGIE GET WELL

Additional Info
Stamps: Fun & Fast Notes
Paper: whisper white, basic black, blush blossom
Ink: jet black stazon
Accessories: ribbon, brad, sakura glitter pen (for butterfly wings)
Difficulty (1-Easy 5-Advanced): 1


HOPPY BIRTHDAY FROGGIE

Additional Info
Stamps: very punny
Paper: whisper white, basic black, mellow moss, DCWV textured green cs
Ink: jet black stazon
Accessories: SU! markers, ribbon, corner rounder, scallop punch
Difficulty (1-Easy 5-Advanced): 2


$1 Studio G Birdie

Additional Info
Stamps: small script, Stuidio G
Paper: whisper white, purely pomegranate, basic black, DCWV yellow textured cs
Ink: jet black stazon
Accessories: SU! markers, ribbon, corner rounder, scallop punch
Difficulty (1-Easy 5-Advanced): 2


LADY BUG WISHES

Additional Info
Stamps: very punny, small script
Paper: whisper white, real red, basic black, DCWV textured black cs
Ink: jet black stazon
Accessories: SU! markers, ribbon, corner rounder, scallop punch
Difficulty (1-Easy 5-Advanced): 2


FISHY BIRTHDAY TO YOU

Additional Info
Stamps: very punny
Paper: whisper white, brilliant blue, soft sky, ballet blue
Ink: jet black stazon
Accessories: SU! markers, ribbon, corner rounder, scallop punch, CB, swirl folder
Techniques: dry embossing
Difficulty (1-Easy 5-Advanced): 2

Tuesday, March 4, 2008

GIRL SCOUT LEADER THANK YOU!


I made this card for the Girls Scout leaders in our Service Unit who organized two exceptional events for our girls... one a Sweetheart Dance, the other World Thinking Day. I used the Girl Scout paper and 3-d stickers by K&Company... I also tried by hand at the *Faith Dot* Technique... I cased PepperRN's layout of her card seen here http://splitcoaststampers.com/gallery/photo/836307?limit=last1.. Thanks for looking!


Additional Info

Stamps: small script
Paper: all K&Company
Ink: none
Accessories: ribbon, cuttlebug, uniball deluxe fine ink pen (for the Faith dots), SU flower punch, brads

Sunday, March 2, 2008

DRIED FLOWERS...


I had fun making these with my mom.. It was all her idea.. She had many verses and poems written down, then we just printed them out on the computer... waited for the flowers to dry, then used some glue sticks to stick them to the paper. We made several and this is the one she gave me.. I just love it!

PAINTED CHAIRS.....


LinkWithin

Blog Widget by LinkWithin